Tranquil Lake - Pre-Sewing Fabric Strips
ADVERTISEMENT
Helpful Info!
2
4
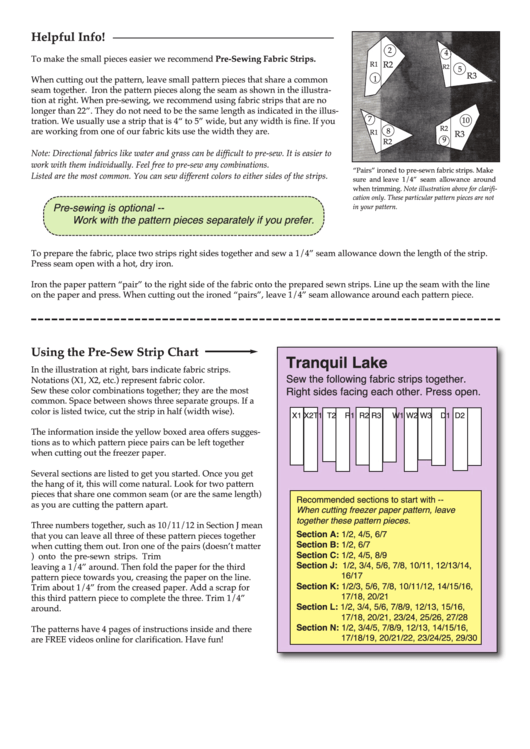
To make the small pieces easier we recommend Pre-Sewing Fabric Strips.
R2
R1
R2
5
R3
1
When cutting out the pattern, leave small pattern pieces that share a common
seam together. Iron the pattern pieces along the seam as shown in the illustra-
tion at right. When pre-sewing, we recommend using fabric strips that are no
longer than 22”. They do not need to be the same length as indicated in the illus-
7
10
tration. We usually use a strip that is 4“ to 5” wide, but any width is fine. If you
R2
8
are working from one of our fabric kits use the width they are.
R1
R3
9
R2
Note: Directional fabrics like water and grass can be difficult to pre-sew. It is easier to
work with them individually. Feel free to pre-sew any combinations.
“Pairs” ironed to pre-sewn fabric strips. Make
Listed are the most common. You can sew different colors to either sides of the strips.
sure and leave 1/4” seam allowance around
when trimming. Note illustration above for clarifi-
Pre-sewing is optional --
cation only. These particular pattern pieces are not
Work with the pattern pieces separately if you prefer.
in your pattern.
To prepare the fabric, place two strips right sides together and sew a 1/4” seam allowance down the length of the strip.
Press seam open with a hot, dry iron.
Iron the paper pattern “pair” to the right side of the fabric onto the prepared sewn strips. Line up the seam with the line
on the paper and press. When cutting out the ironed “pairs”, leave 1/4” seam allowance around each pattern piece.
Tranquil Lake
Using the Pre-Sew Strip Chart
Sew the following fabric strips together.
In the illustration at right, bars indicate fabric strips.
Right sides facing each other. Press open.
Notations (X1, X2, etc.) represent fabric color.
Sew these color combinations together; they are the most
common. Space between shows three separate groups. If a
X1 X2
T1 T2
R1 R2 R3
W1 W2 W3
D1 D2
color is listed twice, cut the strip in half (width wise).
The information inside the yellow boxed area offers sugges-
tions as to which pattern piece pairs can be left together
when cutting out the freezer paper.
Several sections are listed to get you started. Once you get
the hang of it, this will come natural. Look for two pattern
Recommended sections to start with --
pieces that share one common seam (or are the same length)
When cutting freezer paper pattern, leave
as you are cutting the pattern apart.
together these pattern pieces.
Section A: 1/2, 4/5, 6/7
Three numbers together, such as 10/11/12 in Section J mean
Section B: 1/2, 6/7
that you can leave all three of these pattern pieces together
Section C: 1/2, 4/5, 8/9
when cutting them out. Iron one of the pairs (doesn’t matter
Section J: 1/2, 3/4, 5/6, 7/8, 10/11, 12/13/14,
which... 10/11 or 11/12) onto the pre-sewn strips. Trim
16/17
leaving a 1/4” around. Then fold the paper for the third
Section K: 1/2/3, 5/6, 7/8, 10/11/12, 14/15/16,
pattern piece towards you, creasing the paper on the line.
17/18, 20/21
Trim about 1/4” from the creased paper. Add a scrap for
Section L: 1/2, 3/4, 5/6, 7/8/9, 12/13, 15/16,
this third pattern piece to complete the three. Trim 1/4”
17/18, 20/21, 23/24, 25/26, 27/28
around.
Section N: 1/2, 3/4/5, 7/8/9, 12/13, 14/15/16,
17/18/19, 20/21/22, 23/24/25, 29/30
The patterns have 4 pages of instructions inside and there
are FREE videos online for clarification. Have fun!
ADVERTISEMENT
0 votes
Related Articles
Related forms
Related Categories
Parent category: Miscellaneous
 1
1


