Helpful Tips For Shooting Process Shots
ADVERTISEMENT
Helpful Tips for Shooting Process Shots
Consistent Lighting
• For best photo results, shoot in-progress work in a space with one consistent lighting type. Avoid shooting in a space that has both
natural light shining in and indoor lighting (i.e. incandescent or fluorescent lights). Shooting with both indoor and outdoor lighting
will result in a photo with inconsistent color, which must then be corrected with graphics editing software.
• Consider closing curtains to block out natural light and then increase the amount of indoor lights to achieve a well-lit photo. Avoid
hot spots by increasing the number of lamps rather than moving a lamp too close to the work.
• Whenever possible, use soft/diffused light rather than harsh/direct light. A simple method for achieving diffused lighting is to aim a
lamp at a shader (i.e. white poster board) to bounce the light off of and on to the piece of work. This can help illuminate the entire piece
without creating hot spots and harsh shadows.
Clean/Clear Workspace
• Whenever possible, shoot in-progress work on top of a clean, light-colored tabletop or clean piece of canvas.
• Avoid shooting on surfaces that are too similar in color to the claybody you’re working with. Also avoid shooting on top of patterned
or brightly colored surfaces (i.e. colored fabric), which will distract from the work.
• There is no need to clean your entire studio, but a workspace that is free of clutter and extraneous tools not pertaining to the project
helps to make the technique being demonstrated in the photos clearer.
Variety of Angles
• Shoot in-progress work from a variety of angles, always keeping the technique being shown as the main focal point of the shot.
• A few examples of different angles are: overhead or birds-eye view, artist’s POV or over-the-shoulder view, profile or side-view, and
close-up or detail shots.
• Shooting work at profile angles (side-view) often provides a clear view of the process being demonstrated, especially for forming and
surface techniques on vessels.
• Work that is more horizontal in nature (i.e. slabs, tiles, plates, platters) may be best captured by shooting straight down overtop (over-
head or birds-eye view) of the work, but this angle may make it difficult to get a sense of depth in the photo, so it’s ideal to always shoot
at a variety of angles.
• Avoid cropping in on shots while shooting. It is best to include more inside the frame and let the magazine production staff crop im-
ages when the article is being designed.
Focus on the Work
• Be sure that the camera is focused in on the piece of work you are shooting. Many digital cameras have an auto-focus feature, which
may focus on something in the background rather than the work.
• For best photo results, keep the camera’s focusing point in the middle of the frame and hold the camera as still as possible (or use a tripod).
• If the artist’s hands are in the shot, be sure that their movement is paused; otherwise the hands may appear blurry in the photo.
Image Size and Resolution
• Images must be of high resolution. We require images to be at least 5 inches by 7 inches in document size at a resolution of 300ppi
(pixels per inch) in order to be used in print.
• For best results, be sure the camera is set to the highest possible quality/resolution setting when shooting, to ensure the best possible
photo quality.
• Avoid shooting at a lower resolution (i.e. 72 ppi) and attempting to increase the size of photos in a graphics editing software program
later on. Photos will appear pixelated and be unusable for print.
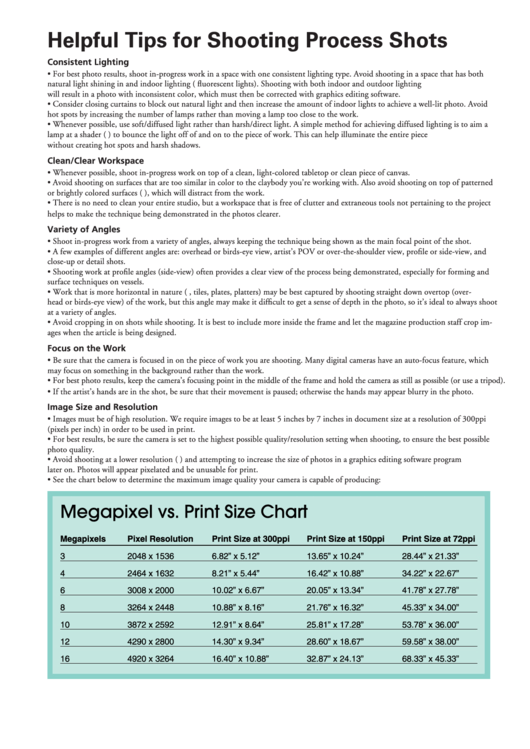
• See the chart below to determine the maximum image quality your camera is capable of producing:
Megapixel vs. Print Size Chart
Megapixels
Pixel Resolution
Print Size at 300ppi
Print Size at 150ppi
Print Size at 72ppi
3
2048 x 1536
6.82” x 5.12”
13.65” x 10.24”
28.44” x 21.33”
4
2464 x 1632
8.21” x 5.44”
16.42” x 10.88”
34.22” x 22.67”
6
3008 x 2000
10.02” x 6.67”
20.05” x 13.34”
41.78” x 27.78”
8
3264 x 2448
10.88” x 8.16”
21.76” x 16.32”
45.33” x 34.00”
10
3872 x 2592
12.91” x 8.64”
25.81” x 17.28”
53.78” x 36.00”
12
4290 x 2800
14.30” x 9.34”
28.60” x 18.67”
59.58” x 38.00”
16
4920 x 3264
16.40” x 10.88”
32.87” x 24.13”
68.33” x 45.33”
ADVERTISEMENT
0 votes
Related Articles
Related forms
Related Categories
Parent category: Education
 1
1


