How To Create An Electronic Regulatory Binder In Sharepoint
ADVERTISEMENT
 1
1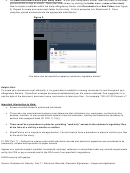 2
2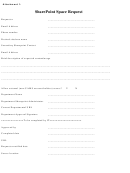 3
3 4
4How to create an electronic Regulatory Binder in SharePoint
Check with your department administrator to see if a Departmental SharePoint site is available. If not, complete the
SharePoint Request Form and submit to IT (see Attachment 1). The SharePoint Security Officer will set up the
website and email the link to the SharePoint site. Please ensure that the persons delegated to conduct regulatory
duties throughout the study have “Full Access” rights in order to modify/delete as appropriate.
1. To create an eRegulatory Binder: From your SharePoint site, click on Libraries on the left menu of the
screen, then from main menu bar on the top of the screen click Create then scroll down and click Document
Library. This will prompt you to enter a name of your eRegulatory Binder. Commonly used names include
“Regulatory Binders”, “Electronic Study Files” or “eRegulatory Binders”. Once complete, click Create to save
the name (see Figure 1).
Figure 1.
1) From Libraries, click Create
3) Enter Binder Name
2) Document Library
2. To create a study folder within an eRegulatory Binder: The name of the newly created eRegulatory Binder
is located in the left column of the “Libraries” section (see Figure 2). There are three options on the top menu
bar: “Browse”, “Documents”, and “Library”. Click on Documents then New Folder and a text box to enter the
study folder name will open. Repeat this step to create additional eRegulatory binders for other studies.
Figure 2.
From the Documents Tab, select New Folder
eRegulatory Binder link will appear here.
ADVERTISEMENT
0 votes
Related Articles
Related forms


Related Categories
Parent category: Education