Snowflake Template
ADVERTISEMENT
Floating snowflakes
Simple snowflake
Materials
needed
Step 1: Fold a square of paper in half to make a triangle. Step 2:
Fold in half again to make a smaller triangle. Put the long edge of
the triangle to the bottom, then fold the left point over to the centre
so the point is below the bottom edge. This makes a vertical line in
•
paper
the centre. Repeat with the right corner so an arrow shape is
•
pencil
made. Step 3: Cut off the two overlapping points at the bottom.
•
scissors
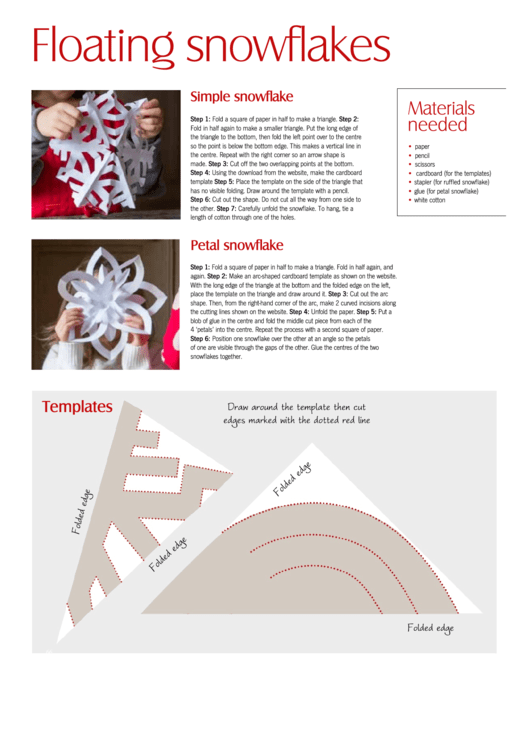
Step 4: Using the download from the website, make the cardboard
•
cardboard (for the templates)
template Step 5: Place the template on the side of the triangle that
•
stapler (for ruffled snowflake)
has no visible folding. Draw around the template with a pencil.
•
glue (for petal snowflake)
Step 6: Cut out the shape. Do not cut all the way from one side to
•
white cotton
the other. Step 7: Carefully unfold the snowflake. To hang, tie a
length of cotton through one of the holes.
Petal snowflake
Step 1: Fold a square of paper in half to make a triangle. Fold in half again, and
again. Step 2: Make an arc-shaped cardboard template as shown on the website.
With the long edge of the triangle at the bottom and the folded edge on the left,
place the template on the triangle and draw around it. Step 3: Cut out the arc
shape. Then, from the right-hand corner of the arc, make 2 curved incisions along
the cutting lines shown on the website. Step 4: Unfold the paper. Step 5: Put a
blob of glue in the centre and fold the middle cut piece from each of the
4 ‘petals’ into the centre. Repeat the process with a second square of paper.
Step 6: Position one snowflake over the other at an angle so the petals
of one are visible through the gaps of the other. Glue the centres of the two
snowflakes together.
Templates
Draw around the template then cut
edges marked with the dotted red line
Folded edge
66
ADVERTISEMENT
0 votes
Related Articles
Related forms
Related Categories
Parent category: Miscellaneous
 1
1


