Student Laboratory Packet
ADVERTISEMENT
 1
1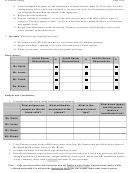 2
2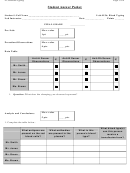 3
3 4
4L13b Blood Typing
Page 1 of 4
STUDENT LABORATORY PACKET
Student’s Full Name ______________________________________
Lab #13b: Blood Typing
Lab Instructor __________________________________
Date ______________
Points _______
Objectives:
To study the inheritance of ABO and Rh blood types.
To determine the blood types of four simulated blood samples.
Background: Read Dragonfly pp. 344-345 and 954.
------------------------------------------PRE-LAB: (Do Before Coming to Lab)-------------------------------------------
Blood type is determined by the presence or absence of antigens on red blood cells. The ABO blood group is
A
B
+
-
represented with alleles I
, I
, and i. Rh factor alleles are Rh
or Rh
which denotes the presence or absence of a
protein called the Rhesus factor. Use these symbols to fill out the genotype section chart below. The first one
has been done for you.
1. Fill out the table below.
Blood
Antigen on
Antibody in
Genotype(s)
Type
Red Blood Cell
Plasma
A
A
A
I
I
I
i
A
A
Anti-B
and
B
AB
O
+
Rh
-
Rh
2. What blood type is the universal recipient? ______ What is its genotype? ______ .
3. What blood type is the universal donor? ______ What is its genotype? ______ .
---------------------------------------------------LABORATORY EXERCISE----------------------------------------------
Materials:
Blood type worksheet, 4 plastic blood typing trays, simulated blood, simulated anti-sera, toothpicks
Procedure:
1. Work in lab groups of four. Obtain one blood typing kit from your lab instructor along with a blood
type worksheet.
2. Place the group blood type worksheet on your lab table, and put one small clear plastic tray in each
of the four boxes labeled Smith, Jones, Green, and Brown. This will help you view what is
happening with the blood.
3. Choose the simulated blood sample labeled “Smith”. Shake the blood sample before using. Use the
tray in the box marked “Smith”, and place 3 drops of blood into each one of the three oval wells
labeled A, B, and Rh.
4. Choose the simulated anti-A serum bottle. Shake the anti-serum. Place 3 drops of anti-A serum into
the well labeled “A” (*Note — To avoid cross-contamination, be careful not to touch the tip of the
dropper bottle to the simulated blood ).
5. Always put the cap securely back on the bottle after each use.
6. Place 3 drops of anti-B serum into the B well.
7. Place 3 drops of anti-Rh serum into the Rh well.
ADVERTISEMENT
0 votes
Related Articles
Related forms


Related Categories
Parent category: Education