A Tailored Suit Printable Tape Measure
ADVERTISEMENT
 1
1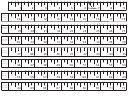 2
2A Tailored Suit Printable Tape Measure
You Need
• A Printer
• Scissors
• Clear Tape
• A Crisp New US Dollar Bill (Any denomination)
Assembly Instructions
1. Print the tape measure (see instructions below)
2. Ensure the printed tape measure is accurate by using it to measure a dollar note; a
dollar (any denomination) is 6.125 inches in length (give or take 1/16 an inch). If you
are off by .125 (1/8) inch or more, ensure you are printing true to size by checking
your printing preferences (see below). If you continue to be off by .125 or more,
contact us
and we’ll ship you a free tape measure immediately.
3. Carefully cut out all 8 pieces of the tape measure.
4. Connect each strip in order as indicated using tape – tape both sides and ensure the
overlap is behind the measurement side. Glue can be used in a pinch, but is not
recommended.
5. Smaller men do not need to attach the last piece (64 to 72 inches).
6. If you have a ruler or yard stick, use it to check for accuracy. Otherwise, you want to
spot check between taped pieces with a dollar note to ensure final accuracy.
The measurement tape is ready for use.
Adobe Acrobat Printing Instructions
The goal here is to print this tape measure true to size. Depending on your version of
Acrobat Reader, "Fit to page" or "Shrink oversized pages to paper size" should NOT be
checked. If you have:
Acrobat Reader 6, 7,or 8 select "none” in the drop down next to "Page Scaling" option.
Acrobat reader 5, make sure that the “Fit To Page" option is not selected.
Acrobat Reader 4, make sure to UNCHECK the following dialogue boxes:
- Shrink oversized pages to paper size
- Expand small pages to paper size
- Auto-rotate and center
ADVERTISEMENT
0 votes
Related Articles
Related forms


Related Categories
Parent category: Life