Apple Box Template With Instructions
ADVERTISEMENT
 1
1 2
2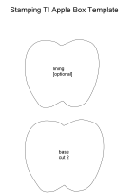 3
3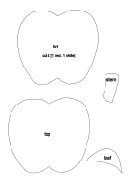 4
4Apple Box
Supplies - Box
• Real Real cardstock
- 8" x 11"; Box Base: 7⅜" x 1½"; 7" x 1½"; Box Lid: 7¾" x 1"; 7⅛" x 1"
• Whisper White cardstock
- 4½" x 4½"
• Soft Suede cardstock
- 1¾" x 1¼"
• Lucky Limeade cardstock
- 1¾" x 2¼"
• Ink pads
- Lucky Limeade; Soft Suede; Real Red
• Punches
- Scallop Circle
• Accessories
- 1 silver brad
There is a YouTube video on assembling the box and the worm at:
Instructions - Box
Use the provided template to cut out two ‘base’ pieces, a ‘top’ and a ‘lid’ from the large piece of Real
Red cardstock. Cut out an additional ‘lid’ from Whisper White cardstock. Cut the ‘stem’ from Soft
Suede and the ‘leaf’ from Lucky Limeade. Optional extra: Use the ‘lining’ piece to cut a piece of DSP
for a pretty lining in the box base.
To make the box base: Take both Real Red strips for the box base and score them at ½
on the 1½
"
"
side. Take the longer of the two strips and score it at ¼
and 7⅛
. Use paper snips to cut notches in
"
"
the ½
side of the strip all the way along, this is what you are going to fold in and adhere to the box
"
lining. Start by placing a length of double sided tape right around the outside edge of the back side
of one of the base pieces and then with the strip that has been scored on both ends, attach to the base
starting in the middle of the apple at the bottom and wrapping towards the top. The second score
line should end right in the middle at the top of the base piece. Attach the remaining strip and place
double sided-tape on the tabs to join the two sides together. Adhere the other ‘base’ piece to the box
covering the notched tabs.
The make the box lid: Take both Real Red strips for the box lid and score them at ½
on the 1
side.
"
"
Take the longer of the two strips and score it at ¼
and 7½
. Use paper snips to cut notches in one
"
"
½
side of the strip all the way along, this is what you are going to fold in and adhere to the red box
"
lid. Start by placing a length of double sided tape right around the outside edge of the back side of
the red lid piece and then with the strip that has been scored on both ends, attach to the red lid
starting in the middle of the apple at the bottom and wrapping towards the top. The second score
line should end right in the middle at the top of the lid piece. Attach the remaining strip and place
double sided-tape on the tabs to join the two sides together. Before you attach the white ‘lid’ piece
1.
ADVERTISEMENT
0 votes
Related Articles
Related forms

")


Related Categories
Parent category: Miscellaneous