Saras Circle Skirt
ADVERTISEMENT
Making a Circle Skirt
These instructions are for drawing a pattern for a skirt that has 6 gores but is circular in its final dimensions.
Benefits over a traditional circle skirt are that a circle skirt has its seams on the grain of the fabric, and tends to
stretch a LOT on the bias, leading to an uneven hem and tripping and falling. The circle‐gore skirt has all of its
seams on the bias, which helps the material to NOT stretch but to keep its shape. Also, depending on the cutting
method, a gored skirt is much more conservative in terms of the amount of fabric needed than a circle skirt is. In
terms of period accuracy, I won't say that a circular skirt is accurate, but gored construction is accurate, and
much more so than circle skirt construction. Fabrics of the time were much too narrow to cut a single panel
quarter or half circle. Here are the pattern instructions. I will try to put up a picture later of what the finished
product should look like. This pattern is HALF of each gore, which is generally cut on a fold or on the selvedge (to
later be sewn together into a complete gore). If anyone wants layout, cutting, and construction instructions, let
me know and I'll add those as well.
You will need: a tape measure, a roll of wrapping paper (preferably the kind with the grid on the back), a flat,
smooth surface, a pen such as a Sharpie, scissors, and a calculator. Also, you will need your natural waist
measurement and a waist‐to‐ankle‐bone measurement for skirt length.
So it should go something like this:
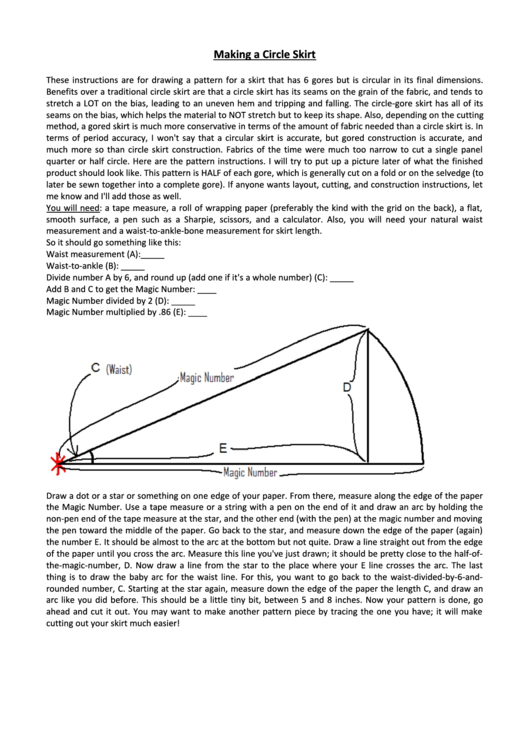
Waist measurement (A):_____
Waist‐to‐ankle (B): _____
Divide number A by 6, and round up (add one if it's a whole number) (C): _____
Add B and C to get the Magic Number: ____
Magic Number divided by 2 (D): _____
Magic Number multiplied by .86 (E): ____
Draw a dot or a star or something on one edge of your paper. From there, measure along the edge of the paper
the Magic Number. Use a tape measure or a string with a pen on the end of it and draw an arc by holding the
non‐pen end of the tape measure at the star, and the other end (with the pen) at the magic number and moving
the pen toward the middle of the paper. Go back to the star, and measure down the edge of the paper (again)
the number E. It should be almost to the arc at the bottom but not quite. Draw a line straight out from the edge
of the paper until you cross the arc. Measure this line you've just drawn; it should be pretty close to the half‐of‐
the‐magic‐number, D. Now draw a line from the star to the place where your E line crosses the arc. The last
thing is to draw the baby arc for the waist line. For this, you want to go back to the waist‐divided‐by‐6‐and‐
rounded number, C. Starting at the star again, measure down the edge of the paper the length C, and draw an
arc like you did before. This should be a little tiny bit, between 5 and 8 inches. Now your pattern is done, go
ahead and cut it out. You may want to make another pattern piece by tracing the one you have; it will make
cutting out your skirt much easier!
ADVERTISEMENT
0 votes
Related Articles
Related forms
Related Categories
Parent category: Education
 1
1 2
2 3
3


