1940'S Traveling Luggage Collage Sheet Page 2
ADVERTISEMENT
 1
1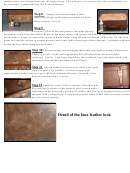 2
2smaller pieces in a random form over the larger pieces. This will give your suitcase the look of old leather. Let
dry overnight. I painted the rim in a Cordova Brown.
Step 8
Stamp a faux finish stamp or other
interesting design on the paper using Staz-on Dark
Brown inkpad. Let dry.
Step 9
Prepare a glaze of one part paint to four parts glazing
medium in a light chocolate brown. Brush on the paper surface and sponge off with a sea sponge, this will prevent
brush strokes. Apply a second darker glaze of Burnt Umber using the same technique. When dry, use fine sand
paper and sand the surface in circular motions until some light colored paper shows through. I stamped with Staz-
on and the faux finish stamp one more time.
Step 10
Cut your images and decoupage them onto your surface, using watered down
Elmer's glue-all. I used our Luggage and Travel Posters from our tissue paper
collection. Let dry. I use large letters from the scrapbook store and rubbed them with
the Staz-on ink and then put them on with Elmer's.
Step 11
you can either use steel wool to finish your metal
clasps or paint with finishes. I choose to paint with
sophisticated finishes because it gave the look of hammered steel. I sponged a little
Staz-on onto the clasps. Let dry.
Step 12
Apply two coats of Gloss varnish. I like Min-wax.
For your final coat mix a light glaze of gloss varnish with a
little burnt umber paint and varnish your surface, this gives your luggage labels a just off
the train 1940's vintage look. I went back over the letters with a little more staz-on after
the first coat of varnish.
Detail of the faux leather look
ADVERTISEMENT
0 votes
Related Articles
Related forms


Related Categories
Parent category: Miscellaneous