Bow Tie Template
ADVERTISEMENT
 1
1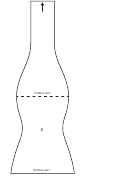 2
2Template Instructions & Notes
1. Cut out each piece.
2. Align the arrows on the two pieces, head to head, and tape
together, with the only overlap being in the section labeled “TAPE.”
*The lines and X’s on the A piece of the template
designate where to sew buttons and button holes.
*The dashed line in the middle of the B piece designates
where to finish blending the paint for a DIY ombré look.
*This template allows the bow tie to be adjusted to fit
most necks. If you’re trying to fit a neck smaller than
14” or larger than 17”, I would recommend adding
or cutting length from the strip portions of the
template pieces as necessary.
ADVERTISEMENT
0 votes


