Dd Form 1626 - Veterinary Necropsy Report Checklist And Guidelines Page 12
Download a blank fillable Dd Form 1626 - Veterinary Necropsy Report Checklist And Guidelines in PDF format just by clicking the "DOWNLOAD PDF" button.
Open the file in any PDF-viewing software. Adobe Reader or any alternative for Windows or MacOS are required to access and complete fillable content.
Complete Dd Form 1626 - Veterinary Necropsy Report Checklist And Guidelines with your personal data - all interactive fields are highlighted in places where you should type, access drop-down lists or select multiple-choice options.
Some fillable PDF-files have the option of saving the completed form that contains your own data for later use or sending it out straight away.
ADVERTISEMENT
 1
1 2
2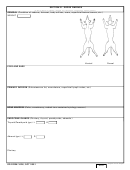 3
3 4
4 5
5 6
6 7
7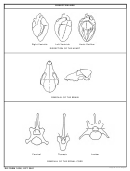 8
8 9
9 10
10 11
11 12
12INSTRUCTIONS FOR COMPLETING DD FORM 1626 (Continued)
SECTION III - GROSS FINDINGS (Continued)
BONES AND JOINTS, NONVERTEBRAL (Para. 3-5 and 3-18)
Carefully open the hip, stifle, shoulder and elbow joints (and others as indicated) and examine for abnormal
synovial fluid, ruptured, stretched or frayed ligaments, erosion and ulceration of articular cartilage, thickened joint
capsules, osteophyte formation and proliferative or thickened synovium. Describe all abnormalities. Collect
representative specimens for histopathologic examination, as indicated.
BRAIN (Para. 3-19)
a. Remove the head.
b. Make a dorsal midline incision from the nose to the foramen magnum.
c. Reflect the skin ventrally. Transect and collect a specimen of the ear canal. Remove the temporal muscles
from the cranium.
d. Use a bone saw to make three cuts through the skull. Do not cut into the brain. The first cut is made
transversely at the anterior limit of the cranial cavity, slightly posterior to the zygomatic process. Rotate the
cranium to one side and connect the end of the transverse cut with the foramen magnum. Repeat on the opposite
side (See figure 3-2 or page 8 of this form).
e. Use a Virchow's skull breaker, bone chisel or similar instrument in the first (transverse) incision, to pry off the
calvarium. Examine the internal surface of the calvarium.
f. If necessary, remove the osseous tentorium cerebelli with rongeurs. Transect the olfactory lobes. Elevate the
rostrum and carefully transect the cranial nerves and pituitary stalk, freeing the brain.
g. Immerse the brain in formalin (see para. 2-10). Bisect the brain only if tissue is required for immediate
laboratory testing, such as for rabies.
PITUITARY GLAND (Para. 3-20)
Incise the dura mater surrounding the sella turcica to free the pituitary gland. Remove it carefully and place in a
labeled tissue cassette.
NASAL CAVITY AND SINUSES (Para. 3-21)
Make a complete transverse cut across the frontal and maxillary bones rostral to the orbits. Examine the exposed
nasal cavity and sinuses. Alternatively, a wedge of bone may be removed to expose these spaces. If indicated,
submit a representative specimen.
VERTEBRAL COLUMN (Para. 3-10)
Examine the ventral surface of the vertebral column and record abnormalities.
SPINAL CORD (Para. 3-22, and Fig. 3-3 or page 8 of this form)
a. Remove the skin remaining on the carcass and examine dorsal subcutis and musculature.
b. Remove the epaxial muscles.
c. Removing the thoracic vertebral arches first allows visualization of the correct placement of the saw blade for
the subsequent removal of cervical and lumbar arches. Do not cut into the spinal cord.
d. Thoracic vertebrae. Transect the spinous processes of the thoracic vertebrae with a bone saw. Cut through
the vertebral arches adjacent to the remnants of the spinous processes at approximately a 45-degree angle. Make
a transverse cut anterior to T-1 and posterior to T-13. Remove the thoracic arches to expose the spinal cord.
e. Lumbar vertebrae. Cut through the vertebral arches immediately dorsal to the transverse processes at a
90-degree angle from vertical (perpendicular to the spinous processes). Make a transverse cut at the lumbosacral
junction. Remove the lumbar arches to expose the spinal cord.
f. Cervical vertebrae. Cut through the vertebral arches midway between the spinous processes and the
transverse processes at a 0-degree angle (parallel to the spinous processes). Remove the cervical arches to
expose the spinal cord.
g. Sacral vertebrae. Opening the sacrum is usually not necessary. If lesions are suspected in the cauda equina,
cutting between the intermediate and lateral sacral crests can expose the sacral vertebral canal.
h. Grasp the dura mater with tissue forceps, cut the nerve roots and remove the spinal cord from the canal.
Examine the dura mater and spinal nerve roots.
i. To facilitate examination and fixation, carefully cut and reflect the dura mater along the dorsal midline for the
full length of the spinal cord.
j. Examine the vertebral column for herniated disc material, osteophyte formation and other lesions.
k. Place a suture through the dura mater (or use some other form of identification) to mark suspect areas of the
spinal cord requiring the attention of the histopathologist.
l. Immerse the spinal cord and the attached dura mater in formalin.
PERIPHERAL NERVES (Para. 3-23). Examine and collect radial and sciatic nerve. Staple both ends of the
collected specimens to a section of tongue depressor labeled with the tissue identification.
DD FORM 1626, OCT 2001
Page 12 of 12 Pages
ADVERTISEMENT
0 votes
Related Articles
Related forms


Related Categories
Parent category: Business