Geometry In Nature - Geometry Worksheets Page 2
ADVERTISEMENT
 1
1 2
2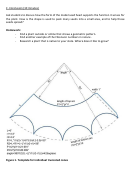 3
3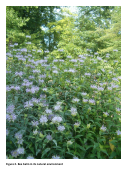 4
4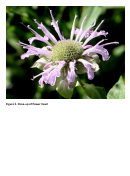 5
5B. Class Project (60 minutes)
Here are step-by-step instructions on how to build a sculpture from truncated cones, one that
will ultimately resemble a sphere. It is modeled after the seed head of bee balm (Monarda
fistulosa), a species of flowering plant that is native to much of North America (see Figure 2 and
3).
These instructions do not need to be read aloud to the class. They can be summarized verbally or
printed for groups of older students to read and follow in small groups. The project will require
cooperation and 3-dimensional thinking and will introduce students to the concept of native
plants and geometry found in nature.
Materials: construction paper, scissors, glue, paper clips or tape, pens/pencils/markers
Steps:
1. Print templates (see Figure 1) for each student. You do not necessarily need to follow
the measurements on the template; feel free to make them as large or small as you like,
but the size needs to be consistent for a single sphere. The templates can be printed on
standard paper as they will just be traced and won’t be incorporated into the final
sculpture where sturdier paper is necessary.
2. Have your students use the template to trace truncated cones onto their construction
paper. Only trace the solid blue line, though the dotted lines can be used to discuss the
geometry of the shape.
3. Next, cut out between 1 and 10 traced, truncated cones depending on class size and
time allotted. The more cones the better because extra cones can be used to build
multiple sculptures, but you will need at least four cones for a single spherical structure.
4. For each cut shape, pull the two narrow ends together to form half of a truncated cone
(like a crown) and glue the overlapping edges. Once glue has dried you can move onto
the next step.
5. Take two truncated cones, put them side by side so that one full edge is in contact
between the two (the bottoms will be at a bit of an angle). Then use two paperclips or
two pieces of tape to fasten the top and bottom of the truncated tubes together.
6. Next, add another truncated cone so that it is in contact with both of the previous
cones. Two edges will be shared between this cone and the previous two. Fasten the
top and bottom of both edges with paperclips or tape.
7. Continue adding truncated cones to the shape until you achieve a spherical shape.
8. Final product may be put on a desk or stand or can be hung from the ceiling.
9. Try making spheres of different sizes by changing the size of the template. Groups of
students could each be assigned a different size template (though all templates used to
make a particular sphere should all be the same size).
ADVERTISEMENT
0 votes
Related Articles
Related forms


Related Categories
Parent category: Education