Bear Pattern Template
ADVERTISEMENT
 1
1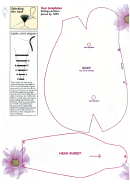 2
2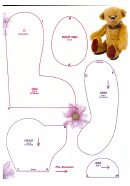 3
3Bear Pattern: Boyish Charm
Designed by Helen West this little lad is full of fun
Handsome Tobias has been designed to sit comfortably and gazes up adoringly at his owner. Created from long pile golden mohair,
his wavy golden fur is complemented by his shiny black eyes. His pronounced snout and wide-set ears further enhance his cheeky
character. When finished he stands at 38cm (15”) tall. This traditional-style ted will appeal to arctophiles of all ages and is simple
enough for a beginner to make. So what are you waiting for? Dig out your sewing box and reach for your needle and thread today!
and pin this to point H on the foot. Next find point K at the centre of
the heel and pin to point K on the foot. Carefully hand-stitch around the
foot easing the pad into place. Repeat for the other leg, taking care to
ensure that both footpads remain identical in shape. Turn the legs right
sides out.
6. Match the ears with right sides together. Stitch from L to M around
the curved edge. Turn them both right sides out and turn up the raw
edge. Stuff the head firmly ensuring that you form a suitable shape.
Gather the base of the head from C to A with strong running stitch.
Insert your head joint and draw the base of the head firmly around the
bolt fastening securely.
7. You can now create Tobias’ facial expression. Use headed pins to
help you decide upon the position of his eyes. Take a length of strong
twine thread through the wire loop of your glass eye and squeeze the
loop together with pliers. Thread the other ends through a long doll
maker’s needle and pass through the eye position to the back of the
Tobias’ head. Repeat with the other eye and secure at the base of his
You Will Need
neck.
• 1/2 metre of mohair
8. Trim the muzzle with sharp scissors into your chosen shape being
• Strong thread to match
careful not to puncture the backing. Next embroider the nose and
• 14cm (5 1/2”) x 10cm (4”) of suede or suedette
mouth. Pin on the ears in different positions until you are happy with
• Six 44m hardboard disc joints
his overall look. Attach the ears firmly with ladder stitch to his head.
• Four 57mm hardboard disc joints
9. Tobias is now ready to assemble. Make a hole in the top of his body
• Five self-locking nylon nut and bolts
at the neck where the darts join. Insert a self-locking nylon nut bolt
• 9mm looped glass eyes
joint into the head. Secure the seam with the nut and bolt inside the
• Embroidery thread
body. Tighten the joint well, ensuring that Tobias’ head will still turn.
• Strong thread
Insert the arms and leg joints in the same way, feeding your joint and
• Polyester filler
bolt into the pre-pierced holes. Tighten with a nut and bolt driver until
• Plastic pellets
the joints are secure.
10. Pour a handful of plastic pellets into the back opening. Fill the rest
STEP BY STEP
of the body firmly with polyester stuffing, paying particular attention to
1. Read all the instructions through carefully before you begin. Trace
the neck and the area around the nut and bolt joints. Stuff the arms and
or photocopy the pattern pieces. It may be helpful to paste them onto
legs in a similar fashion taking care to fill them evenly and firmly. Use
cardboard to create sturdier templates. Take a moment to study your
a stuffing stick or the end of a wooden spoon handle to push the
chosen mohair to determine its pile direction. Mark this clearly with an
stuffing firmly into awkward arms and legs. Be careful not to force your
arrow on the back of your fabric before you continue. With the reverse
seams.
side of your mohair laid out flat, begin to arrange your pattern pieces.
11. Finally, use a teasel brush to move forward and backwards against
Only transfer them onto the backing once you’re satisfied that all of the
the pile, paying particular attention to his seams, ears and footpads. To
templates fit comfortably. Next trace each pattern piece onto the reverse
give Tobias an extra special touch you could tie a ribbon or collar
of your fabric with a soft pencil.
around his neck.
2. Use sharp scissors to cut out your pattern pieces taking care to avoid
the pile. Try to keep the points of your scissors close to the backing of
HINTS AND TIPS
the mohair and keep it flat. This will also prevent too much fluff being
• You may find that the pile of the mohair doesn’t sit right after stuffing
disturbed. Next cut out the foot pads.
and forms a visible line. To remedy this, turn the seam by inserting a
3. Place the two head pieces right sides together. Use strong thread to
strong sewing needle from side to side until it lies flat or is no longer
sew from A to B. Match the middle of the head gusset B with the centre
visible.
seam B of the muzzle. Carefully ease the head gusset from B to C to fit
• When stuffing your bear take time to tease out the fibres of your
chosen filler. Then gradually add a small amount at a time to create a
equally from C to C on both sides of the head. Turn right sides out.
4. Stitch the top and bottom darts in both body pieces. With right sides
good firm feel.
together, stitch from D around the body to E leaving an opening in the
• For best results don’t rush your bear, especially when it comes to the
back for jointing and stuffing. Use a large knitting needle or awl to
finer details like trimming. Make sure that any work you undertake is
carried out in good light.
pierce the joint position and turn the body right side out.
5. Match the arm pieces together and stitch from F to G leaving an
opening as marked for stuffing and jointing. Repeat for the other arm.
BEAR FACTS
Pierce a hole for the joint position using a knitting needle or awl. Next
For more information on Helen West’s designs call Cloth Ears on 020
place the leg pieces right sides together and stitch from H to I and K to
8898 2389.
J leaving an opening for stuffing and jointing at the top. Mark out the
joint position as before. Take the footpad and find the centre mark H
ADVERTISEMENT
0 votes
Related Articles
Related forms


Related Categories
Parent category: Miscellaneous