Ring Sizer Chart
ADVERTISEMENT
RING SIZER
For a precise measurement, it is our recommendation that you have your ring finger
Conversion Chart
sized at your local jeweller. If not feasible, we have provided you with this paper ring
sizer. Please follow the directions closely to attain a proper measurement. You will be
USA &
UK
European
prompted for your ring size when placing your order.
Canada
2
E
3
43
1/2
3
F
4
44
3
G
5
45
1/2
4
H
7
47
4
I
8
48
1/2
5
J
9
49
5
K
10
50
1/2
6
L
11
51
6
M
12
52
1/2
Read
7
N
14
54
7
O
15
55
1/2
B
Size
A
8
P
16
56
Here
8
Q
17
57
1/2
9
R
19
59
S
9
20
60
1/2
10
T
21
61
3 1/2 inches
10
U
23
63
1/2
11
V
24
64
11
W
25
65
1/2
12
X
26
66
Page scaling must be set to NONE
12
Y
28
68
1/2
13
Z
29
69
-
Z+1
-
-
-
Z+2
-
-
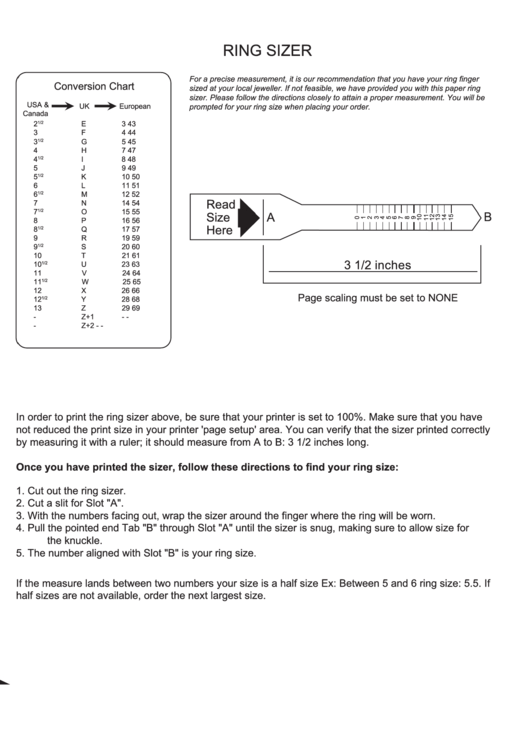
In order to print the ring sizer above, be sure that your printer is set to 100%. Make sure that you have
not reduced the print size in your printer 'page setup' area. You can verify that the sizer printed correctly
by measuring it with a ruler; it should measure from A to B: 3 1/2 inches long.
Once you have printed the sizer, follow these directions to find your ring size:
1.
Cut out the ring sizer.
2.
Cut a slit for Slot "A".
3.
With the numbers facing out, wrap the sizer around the finger where the ring will be worn.
4.
Pull the pointed end Tab "B" through Slot "A" until the sizer is snug, making sure to allow size for
the knuckle.
5.
The number aligned with Slot "B" is your ring size.
If the measure lands between two numbers your size is a half size Ex: Between 5 and 6 ring size: 5.5. If
half sizes are not available, order the next largest size.
ADVERTISEMENT
0 votes
Related Articles
Related forms
Related Categories
Parent category: Life
 1
1


