Lab: Blood Exploration Page 4
ADVERTISEMENT
 1
1 2
2 3
3 4
4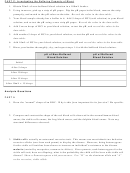 5
5 6
6PART B: Introduction to ABO Blood Typing
1. Place a piece of white paper (preferably with print) behind the blood typing plates.
2. On the paper behind the plates, label each plate as follows:
a. “#1” = Mr. Jones
b. “#2” = Mr. Smith
c. “#3” = Mr. Green
d. “#4” = Ms. Brown
3. Place 2-3 drops of simulated Mr. Jones’ blood into each well (“A”, “B”, and “Rh”) on plate #1.
4. Next, place 2 drops of simulated anti-A agglutinin serum in well “A”, 2 drops of simulated
anti-B agglutinin serum in well “B”, and 2 drops of simulated anti-Rh agglutinin serum in well
“Rh”.
5. Using the clean end of a toothpick thoroughly mix each well for approximately 30 seconds for
all the well plates. It is important to use a clean end of a toothpick for each well as you do not
want to cross-contaminate your samples!
6. Observe each well and record results in the data table. If you are uncertain as to whether or not
agglutination occurred, try reading a sample of text through the blood. If you cannot read the
text, agglutination did occur.
+
a. If agglutination occurred in a well, mark a “
” to indicate a positive reaction.
—
b. If no agglutination occurred, mark a “
“ to indicate a negative reaction.
7. Use the results of your agglutination tests to determine the ABO blood type of the individual
(A, B, AB, or O and Rh+ or Rh-).
8. Dispose of all blood samples in the sink. Thoroughly wash and dry the well plates and
toothpicks for reuse before returning your materials to the baggie.
Data
Table 1: Agglutination Results
ABO Blood
Anti-A Serum
Anti-B Serum
Anti-Rh serum
Blood Sample
(+ or –)
(+ or –)
(+ or –)
Type
#1-Mr. Jones
#2-Mr. Smith
#3-Mr. Green
#4-Ms. Brown
ADVERTISEMENT
0 votes
Related Articles
Related forms


Related Categories
Parent category: Education