Bernina Owl Puppet Template
ADVERTISEMENT
 1
1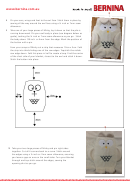 2
2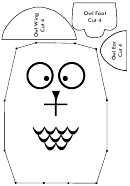 3
3BERNINA OWL
project
Method
1
Download the BERNINA Owl Design file and transfer it to your
machine using your preferred method.
2
Hoop up the tearaway and place the hoop onto your machine. Lay
your Minky on top of the hoop ensuring the pile runs toward you.
Place your solvey on top of the Minky.
3
The first colour of the design will be a tacking stitch. Hold the Minky
and solvey in place as it tacks them down.
4
The next colour is the placement line for the appliqué. Once your
machine has finished stitching, lay your piece of white fabric on top
of the stitching line. The next colour will tack the fabric down using
a zig zag. When the stitching has completed take the hoop off your
machine and carefully cut away the excess fabric so you are left with
2 circles.
Place the hoop back onto the machine and stitch out the next colour.
This will cover the raw edges with a satin stitch.
Materials List
• 2x Minky Rectangles 60cm x 90cm
• Scrap of Minky 30cm x 90cm
• Tearaway 25cm x 29cm
• Solvey 20cm x 20cm
• Scrap of White Homespun
• 1 x Black Button
• White Sewing Thread
5
Continue embroidering the design
• Embroidery Thread: White, Black,
until it is complete, changing colours
Yellow
as require.
• Pattern Template (print A4 at 100%)
6
Take you design out of the hoop.
• Pins
Unpick the tacking stitch and remove
• Ruler
the tearaway and solvey. Use your
• Marking Pen
master template to cut the owl face
to the correct size. Cut out the ears,
wings and feet.
7
Stitch the ears, wings and feet together using a ¼ inch or 7mm seam
allowance. Make sure you leave the flat side completely open. Turn
the ears, wings and feet through.
ADVERTISEMENT
0 votes
Related Articles
Related forms


Related Categories
Parent category: Miscellaneous