Snowflake Template
ADVERTISEMENT
 1
1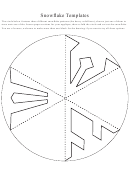 2
2January Block – Snowflake:
I am not a fan of fusible applique, the results are stiff and there is some
debate on the long-term adverse effects of the adhesives on the fabric. This raw-edged machine technique is
fairly easy (especially on designs that involve straight edges) and leaves the finished quilt soft and supple,
Materials:
You will need:
One 11” square of a medium to dark blue fabric or subtle print
One 9” square of a white on white print.
One 8 ½” square of freezer paper
White sewing thread (and/or cream or light blue for decorative stitching
9” square medium-light weight tear away embroidery stabilizer
Draw a 7 ½” circle onto the papery side of the freezer paper with a compass and cut the circle out. Fold it in
half and then the half circle into thirds. Put a small ‘x’ on one of the outer sides (so you can identify the correct
wedge when unfolded) then unfold the freezer paper and choose one of the three template segments on the
following page. There are three different designs - choose just one and trace it onto the wedge you marked with
the ‘x’. Re-fold the freezer paper circle and cut the design out of all six layers at once. Unfold the template and
iron it with a dry iron set on ‘cotton’ to the right side of the white print, set aside to cool slightly. Fold the blue
fabric into quarters and pinch at the center point to mark the center of the square. Position the square of white
fabric with the template over the blue fabric centering it as well as you can (it need not be perfect). Using white
thread with a straight stitch adjusted to slightly shorter than a normal size, sew the white fabric to the blue
following the paper template edge as closely as you can without stitching through the paper. If you do
inadvertently catch the paper, it’s ok, you can still tease the template off but it will ruin the template for future
use and may distress the stitches while freeing the paper. The stitching can be carried out with a free-motion
foot if you are comfortable using one or use a standard presser foot and pivot at the corners of the design.
Remember to tack the starting and ending points, then gently peel away the paper template (warm it slightly
with the iron if it doesn’t let go easily). Use a fine bladed pair of embroidery scissors to trim the excess white
fabric down to about 1/8” beyond the stitching line. Place a 9” square of medium-light weight tear away
stabilizer under the blue fabric and pin in place (this will help prevent distortion while satin stitching the edges
of the snowflake. Set your satin stitch to a width adequate to cover the raw-edges and the stitched line on the
snowflake and using a white, cream or pale blue thread, stitch along the perimeter of the applique; if desired
you can try out a simple decorative embroidery stitch instead of a satin stitch. Press the block and leave it at
11” so the winner can trim all the blocks to the same size.
ADVERTISEMENT
0 votes
Related Articles
Related forms


Related Categories
Parent category: Miscellaneous