Interlocking Snowflake Template
ADVERTISEMENT
 1
1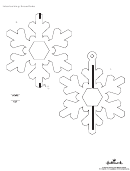 2
2Interlocking Snowflake
Crafter level: Intermediate
Time needed: 15-20 minutes
What you’ll need
•
Printout of interlocking snowflake template on blank
copy paper
•
Card stock or old greeting cards
•
Craft knife and cutting mat or sharp scissors
•
Tape
•
Small hole punch
How to make it
1.
Cut roughly around the outside of both snowflakes on your copy paper printout, leaving ¼ inch or more
of paper around both shapes.
2. Place both snowflakes on one sheet of card stock or on the front of a large, open greeting card. Tape in
place.
3. With a craft knife or pair of sharp scissors, cut along the solid lines of your snowflake templates through
both layers (paper and card stock). Use small hole punch for center hole on the No. 1 snowflake.
4. Carefully pull off any remaining taped pieces of the snowflake templates from the two card stock
snowflake shapes.
5. Lift up one of the notched tips on your No. 2 card stock snowflake.
6. Slide your No. 2 snowflake through the large center opening of the No. 1 snowflake, aligning the small
notches at the top and bottom. Press the notched tip of the No. 2 snowflake back down to “lock” them
together.
ADVERTISEMENT
0 votes
Related Articles
Related forms


Related Categories
Parent category: Miscellaneous