World History Timeline Activity Page 2
ADVERTISEMENT
 1
1 2
2 3
3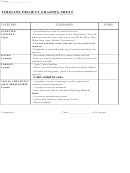 4
4Name: ______________
CREATING YOUR TIMELINE IN THE EXCEL TEMPLATE: (OPTIONAL)
If you choose to use the online excel file to format your timeline here are a few tips…
1.
GETTING THE FILE:
“Fall Semester” “Fall Projects” mouse over the link to the excel file
Go to
o
right-click save-asSelect a destination on your computer open file when the dialogue comes up.
2.
ADDING DATA:
Title: Replace with your own descriptive title of your timeline.
o
Year (Column B): Add a single year to each yellow row…as many times as needed. (If more space is needed, simply click
o
on the chart and move it down the screen).
i. Caution! Do not put any dashes or other symbols in this field or it will not plot in the timeline chart below!
Events (Column C): Add the corresponding event to each matching field. If you want to see the date with the name of the
o
event, type your entry as follows:
i. Ex: 1492 – Columbus Sailed the Ocean Blue.
ii. Note this may seem redundant, but it is the only way to label the event on the timeline chart….also, check your
spelling and punctuation carefully.
Height (Column E): Use this column to adjust the height of the event in the timeline chart to prevent overlapping and to
o
improve clarity. (+ = above / - = below )
3.
ADJUST THE AXIS:
Right click on the x-axis in the chart select format axis click on the scale tab in the open dialogue change the
o
minimum to the start date and maximum to the end date.
4.
OTHER ADJUSTMENTS:
Adding Color: Click to select the various event text boxes on the chart either change the text color using the font-color-
o
tool or change the background color by using the paint-bucket tool.
Changing size of the chart: Click on the chart to reveal the handles click and drag the corners to the desired size.
o
5.
PRINT INSTRUCTIONS:
Click on the chart to select it file Print… Make sure under “Print What” in the lower left corner, selected
o
chart is checked Click Preview or OK.
You can also copy paste it into word and resize and print if you like.
o
6.
TROUBLESHOOTING:
MY DATES ARE NOT PLOTTING???
o
i. 1
Check your scale on the x-axis and make sure the dates fall within the scale.
st
ii. 2
Check for any dashes or other symbols in the B-Column (DATES)…this will prevent it from plotting any of the
nd
data correctly!
iii. Ex: Do NOT enter in Column B: 1492-1493. Instead enter 1492 in Column B and 1492-1493 Columbus’ 1
Voyage
st
to the New World in Column C (Events)
Life Events for Benjamin Franklin, 1706-1790
Elected Pres. of Amer. Phil.
Opens Printing office in PA
Society
Sees M ontgolfier Brothers
Poor Richard: An
1 st to Fly in Balloon
Almanack
Born in Boston
Delegate to Constitutional
Appointed Postmaster of
(1 /1 7/1 706)
Convention
Phil. PA
Dies in Phil. PA (4/1 7/1 790)
1700
1710
1720
1730
1740
1750
1760
1770
1780
1790
1800
M oves to London
Famous Kite Experiment
Treaty of Peace with Great
Britain
Apprentices at Printing
Book on Electricity
Treaty of Alliance with
Shop
Published in London
France
Declaration of
Independence
ADVERTISEMENT
0 votes
Related Articles
Related forms


Related Categories
Parent category: Business