Microsoft Dynamics Gp Cheat Sheet Page 2
ADVERTISEMENT
 1
1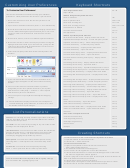 2
2Customizing User Preferences
Keyboard Shortcuts
Tools Keyboard Shortcuts
alt + f9
To Customize User Preferences:
Report Writer
Use the User Preferences window to modify your individual
Window Navigation Keyboard Shortcuts
preferences. These preferences are saved on a per user basis.
Move to next field
tab
1. Be sure the current user ID is the one that you want to set
Move to previous field
shift + tab
preferences for.
Move from scrolling next
ctrl + tab
Move from scrolling previous
shift + ctrl + tab
2. Open the User Preferences window. (Home >> User Preferences)
Default button on window
enter
3. Mark the Horizontal Scroll Arrows option to display scroll arrows
Close the current window
ctrl + w
for some fields. Marking this option will allow you to use scroll
Exit application
alt + x
arrows on either side of the field to view the entire account
number.
Window-Specific Keyboard Shortcuts
Edit Purchase Order Status— Display Vendor Item Detail
ctrl +d
4. Mark Printer, Screen, or both to set default report destinations.
Payables Manual Payment Entry — Create Temporary Vendor
ctrl + t
5. Mark Tab or Return to select the entry key used for moving the
Payables Transaction Entry — Create Temporary Vendor
ctrl + t
highlight from field to field. If you select Return, you’ll press the
Purchase Order Entry — Create Temporary Vendor
ctrl + t
enter key to move from field to field and shift + enter to save or
Purchase Order Entry — Display Vendor Item Detail
ctrl + d
process information on a window.
Purchase Order Entry — Open Item Detail
ctrl + e
6. Select how to display commands in Microsoft Dynamics GP
Purchase Order Inquiry Zoom — Display Vendor Item Detail
ctrl+ d
windows.
Purchase Order Inquiry Zoom — Open Item Detail
ctrl + e
Action Pane
Purchase Order Processing Item Inquiry — Display Vendor
ctrl + d
Item Detail
Purchasing Invoice Entry — Display Vendor Item Detail
ctrl + d
Purchasing Invoice Entry — Open Item Detail
ctrl + e
Purchasing Invoice Entry — Open Match Shipments to Invoice
ctrl + m
Action Pane
Strip
Purchasing Invoice Inquiry Zoom— Display Vendor Item Detail
ctrl + d
Purchasing Item Detail Entry — Display Vendor Item Detail
ctrl + d
Menu Bar
Purchasing Item Detail Inquiry Zoom — Display Vendor Item
ctrl + d
Detail
7. If you use Sales Order Processing, select the default sales
Purchasing Item Receipts Zoom — Display Vendor Item Detail
ctrl + d
document type that appears in the Sales Transaction Entry
Purchasing Vendor Detail Entry — Create Temporary Vendor
ctrl + t
window.
Receivings Item Detail Entry — Display Vendor Item Detail
ctrl + d
8. Choose Local or Remote to determine where you want
Receivings Transaction Entry — Create Temporary Vendor
ctrl + t
designated process to be performed. Refer to your System
Receivings Transaction Entry — Display Vendor Item Detail
ctrl + d
Administrator’s Guide (Help >> Contents >> select System
Receivings Transaction Entry — Open Item Detail
ctrl + e
Administration) for more information.
Receivings Transaction Inquiry Zoom — Open Item Detail
ctrl + e
9. Choose an option to specify Microsoft MapPoint mapping
Receivings Transaction Inquiry Zoom— Display Vendor Item
ctrl + d
settings.
Detail
10. Choose Reminders, Display, Password or AutoComplete to
Sales Transaction Entry — Open Item Detail
ctrl + e
continue modifying your preferences, or choose OK to close
Sales Transaction Entry— Quick Print
ctrl + q
the window and save your changes.
Select Purchase Order Items — Display Vendor Item Detail
ctrl + d
Vendor Account Maintenance — Open Additional Vendor
ctrl + e
List Personalizations
Accounts
Other Common keyboard shortcuts
View Functional Currency
ctrl + u
Columns: You can drag and drop columns to put them in the order
View Originating Currency
ctrl + o
that you want them. You can also resize the width of the columns
to be the size that you want.
View Reporting Currency
ctrl + r
Account Alias
ctrl + q
Sort Order: You can sort a list by clicking on any one of the column
Analysis
ctrl + y
headings that are displayed in the list.
Information Pane: You can choose to hide or show the information
Creating Shortcuts
pane by choosing Show >> Information Pane from the list title
drop-down menu. You also can resize the information pane
vertically by dragging the top border up or down.
To create a shortcut to the current Microsoft Dynamics GP window:
Filter Options: You can hide or show the filter options area by
1. Open the window to add a shortcut for.
choosing Show >> Filter Options from the list title drop-down
2. Choose File >> Add to Shortcuts.
menu.
To create an external shortcut:
1. Right-click anywhere in the list of shortcuts and choose
Action Pane: You can hide an action pane by choosing
Add >> Add External Shortcut.
Show >> action pane from the list title drop-down menu.
2. The Add External Shortcut window appears.
3. Enter a name for the application or file in the Name field.
4. Choose the Browse button to locate the external application or file to add.
The Select an Application window appears.
5. Select a program or file. Choose Open to add its path to the Command Line
Learn more about Microsoft Dynamics GP at
field in the Add External Shortcut window.
6. Choose Add to create a shortcut to the file.
613.232.2495 x 229 |
7. Repeat steps 3 through 6 for each external shortcut you want to create.
8. Choose Done to close the Add External Shortcut window.
ADVERTISEMENT
0 votes
Related Articles
Related forms


 - Log Search Cheat Sheet")


Related Categories
Parent category: Education