Make A Pirate Map Lesson Plan Template
ADVERTISEMENT
 1
1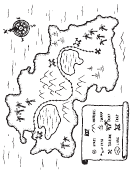 2
2Make a Pirate Map
This lesson plan is good for reviewing maps, map keys, symbols, and compass directions
Materials:
Sample map (see page 2)
Brown craft paper or a piece of a brown paper bag, at least 9” x 12”
Scrap paper
Pencils
Colored Markers
Directions:
1. In one corner of the brown paper, use a ruler to draw a box about 3” x 4” for the Map
Key.
2. In another corner, use a compass or jar lid to draw a 1” circle for the directional
compass. You can review compass directions with the class and add four points
labeled with “N”, “S”, “E”, and “W” in the correct places.
3. Next, draw a large island shape. You can show a real map to the kids so they can see
islands are not very smooth, but have lots of bays, coves, inlets, etc. around the edges.
4. On scrap paper, design symbols for map. Brainstorm these with the class. You’ll
definitely want to include a starting place, a treasure spot, and a path. Encourage the
students to add other symbols for clues, including mountains, trees, lakes, rivers,
swamps, rocks, traps, dangerous animals, etc.
5. Draw the path and symbols on the map in pencil first. The starting place should be at
one edge of the island where the pirate ship could anchor. Draw the symbols and
write their meanings in the map key.
6. Add decorations to the ocean area of the map, such as waves, ships, sea monsters,
dolphins, mermaids, sharks, etc. Decorate the map compass to look like a sun, crossed
bones, etc.
7. Use the markers to trace all the pencil lines and add color.
8. Crinkle paper and tear edges slightly to make map look old.
ADVERTISEMENT
0 votes
Related Articles
Related forms


Related Categories
Parent category: Education