Saras Circle Skirt Page 3
ADVERTISEMENT
 1
1 2
2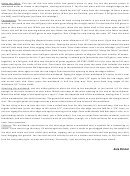 3
3Along the fabric: You can cut this one with either one pattern piece or two. Lay out the pattern pieces in
numbered order as shown in the diagram, starting with piece 1. Lay the first piece with the straight edge on the
fold. The second piece, and the other even pieces, should be laid 1/2" away from the selvedge, to leave a seam
allowance for the straight seams. Cut all the pieces. When you are finished, you will have 3 full gores (cut from
the fold), and 6 half gores (cut from the selvedge).
Construction: The construction is basically the same for both cutting methods. If you used the along the fabric
method, you need to sew the half gores into whole gores along the straight seams. Pin and sew the half gores in
pairs as they were cut out. When you sew the first pair, leave the top (waist end) of the seam open about 10
inches; this will be the opening where you can fasten the waistband. If you used the across the fabric method,
you only have one pair of half gores to sew together. Don't forget to stop sewing the seam 10" from the waist
end.
Next, sew the gores along the diagonal seams using a seam allowance of 1/2" at the most. If you sew the seams
too wide, the skirt will be too small in the waist. Sewing the seams from the bottom (wide) end toward the wais
end will help keep them from sagging after they're sewn. Since these seams aren't on the selvedge, you'll need
to zigzag the seam allowances to keep them from fraying in the wash. If you used the "along the fabric" method,
you will want to alternate sewn half gore panels with full gore panels to disguise the total number of seams.
Sometimes it's easier to do this if you start out by sewing a seamed gore (previously two half gores, now sewn
together) to a full gore, and then sew the pairs of gores together. BE VERY CAREFUL in this step that all of your
seams end up on the inside of the skirt. Press open the seams. As you press the seam that includes the waist
opening, you want to press the edges open all the way to the waistband, then turn the open ends under into the
fold and press them again to hide the raw edges. Sew around this opening to keep the edges hidden.
Next, you need to construct and attach the waistband. Zigzag the edges of the waistband (it's easier to do it now
than after the waistband is sewn). Turn the short ends under 1/4", then 1/4" again to hide the raw edges, and
sew across each end. Next, press the waistband in half the long way. Also, press both long edges of the
waistband 1/2" to the inside.
Attaching the waistband: you can either gather or pleat the skirt to the waistband, or just match it if it's close
enough to the same measure as your waist. Match one edge of the waist opening to the end of the waistband.
Match the other edge of the opening to a spot 1" from the opposite end of the waistband, leaving that 1" or so
of the waistband at the end for overlap. The gored skirt won't have nearly as much pleating as the straight panel
skirt. The straight panel skirt page also has a decent description of how to attach the waistband.
The last thing to do is to hem the skirt. I use a rolled hem foot for this, because it's fast and easy. You can do a
regular rolled hem (press the edge to the inside 1/2", then press the raw edge into the fold for a 1/4" hem), or
you can zigzag the entire skirt edge and apply trimming to the edge. Extra wide double fold bias tape is nice, as is
quilt binding (which is basically the same, just a little wider). You can cut strips from another material, such as
broadcloth, and use those instead. You don't want to use ribbon, though; it's a little too fancy for us as peasants,
even "party peasants".
Closures: The waistband construction on the skirt page leaves a waistband that is suitable for a drawstring or
elastic, if you want to go that way. I'd advise against elastic, since it tends to get dragged down by the weight of
the skirt and come out from under your bodice, tripping you at inconvenient times and also getting very dirty
from dragging the ground. You can also use the overlap to put on a button and button hole, or flat skirt hooks
(use the heavy duty type, at least two of them). Personally, I just use safety pins to keep them closed.
‐Sara Penner
ADVERTISEMENT
0 votes
Related Articles
Related forms


Related Categories
Parent category: Education