Acid Titration Curve Page 3
ADVERTISEMENT
 1
1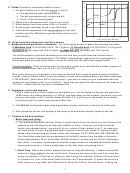 2
2 3
3 4
4level down to 0.00 mL by draining out the appropriate amount via the stopcock (strictly speaking
you need not start at precisely 0.00 mL, but when making a titration curve, it is very convenient to
do so because then your volume READINGS will equal your “volume added”).
c. Stir plate/pH electrode/buret setup. You will find the pH electrode immersed in a buffer solution
“plug”. Remove it carefully from that solution (keeping it upright at all times) and rinse it with some
deionized water from your wash bottle. Put the plug in a safe place (you’ll need to replace it after
the experiment!). Carefully remove excess water from the electrode by lightly blotting (NOT
“wiping”) the tip with a tissue (Kimwipes). Calibrate the pH electrode using two buffers at specific
pH values (7.00 and 4.00). Place and center your beaker of acid solution on a stir plate, and get
your stir bar spinning at a reasonable rate by adjusting the “stir” knob on the stir plate (the knob is
very sensitive!) Once you get the stir bar spinning, never touch the knob again (unless of course
the bar stops spinning)--just let it stir constantly throughout the entire experiment.
Now lower the pH electrode (on the support arm holder) into your solution (in the 100 mL beaker)
such that the tip is completely submerged, but the bottom of the tip is above the level of the top of
the stir bar. The electrode need NOT be centered in the solution; it can be anywhere as long as the
tip is submerged. Move the ring stand with the buret so that the buret tip is over the 100 mL
beaker, AND in a place such that you can access the stopcock. Lower the buret so that the tip is
below the rim of the beaker, but well above the liquid level. You may need to adjust the position of
the pH electrode and buret stand to get things to “fit” okay (you may also need to rotate the buret
clamp on the ring stand to get things to work out; ask me). You are now ready to begin!
2. The titration.
Note: Remember that you should know approximately where to expect your equivalence point, and
thus your half e.p., (look closely at the calculation in III A)! Use this to help you gauge “where
you’re at” in the titration (see below). ALSO: your goal is not to stop when you reach the
equivalence point!!! This is not a standard “titration”—you want to generate a full “curve”.
First measure and record the pH of your solution BEFORE adding any NaOH solution (volume
added = 0.00 mL). Then add ~2 mL and record the new buret reading (precisely!) and the
corresponding pH. You will need to hit “READ” each time that you want to make a new reading.
Then add another ~2 mL, and so on, recording the pH values and buret readings each time. As you
get closer to the equivalence point, you will need to add smaller and smaller amounts of
NaOH or else you will likely “miss” the equivalence point. Note that your change in pH after
each 2-mL addition will initially be sizable (> 0.5 pH unit), then it should get smaller as you approach
the half-equivalence point (pH probably ≤ 0.1 pH unit around middle of buffer region), and then it
will begin to get larger again as you approach the equivalence point. As a guideline, after you’ve
passed the half-equivalence point, when a pH reading is more than about 0.25 pH units higher than
the previous reading DO NOT ADD ANOTHER 2-mL aliquot! You do not want to "miss" the
equivalence point, right? (Why not?) At this point, add titrant more judiciously, perhaps in 0.5 mL
increments at first, while closely monitoring the increase in pH with each addition. If the pH
increases by more than 0.2 units after an addition try making additions dropwise, and only record the
buret reading and pH when the pH is about 0.2 units above your last reading. Keep making
dropwise additions through the equivalence point--until it seems to take multiple drops to get a pH
increase of 0.2 units. At this point, you can start making progressively larger additions again since
the pH will begin to get less sensitive to additions of titrant. Ultimately make at least FOUR 2-mL
additions AFTER you see the pH reach about 11.5. (Please ask me to confirm before you “stop”!)
When you are done, remove the electrode, rinse it with deionized water, and put it back into the
buffer solution it was in originally. Carefully dump the titrated solution down the drain, making sure
to recover the stir bar and return it. Rinse any unused titrant down the drain as well, and rinse the
buret with deionized water before returning it.
D. Raw Data “Format”. Plot your pH/Volume raw data in Excel using an X-Y scatter plot (NOT a “line
plot”!). Make sure you plot pH (y-axis) vs. Volume (in mL) of NaOH solution added (x-axis).
3
ADVERTISEMENT
0 votes
Related Articles
Related forms


Related Categories
Parent category: Education