What-If Analysis, Charting, And Working With Large Worksheets Page 15
ADVERTISEMENT
 1
1 2
2 3
3 4
4 5
5 6
6 7
7 8
8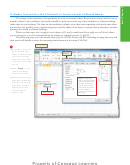 9
9 10
10 11
11 12
12 13
13 14
14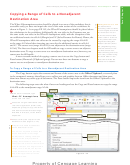 15
15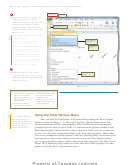 16
16 17
17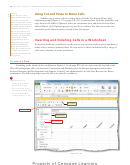 18
18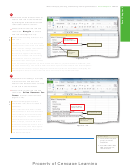 19
19 20
20 21
21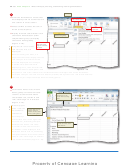 22
22 23
23 24
24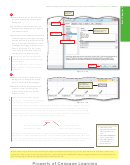 25
25 26
26 27
27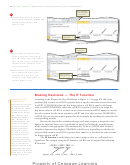 28
28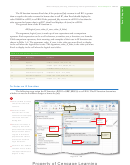 29
29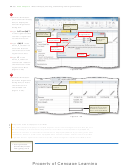 30
30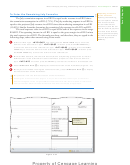 31
31 32
32 33
33 34
34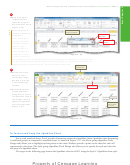 35
35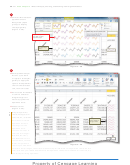 36
36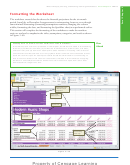 37
37 38
38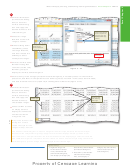 39
39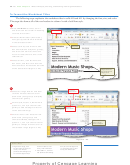 40
40 41
41 42
42 43
43 44
44 45
45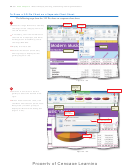 46
46 47
47 48
48 49
49 50
50 51
51 52
52 53
53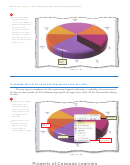 54
54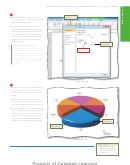 55
55 56
56 57
57 58
58 59
59 60
60 61
61 62
62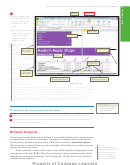 63
63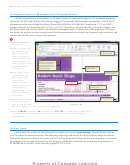 64
64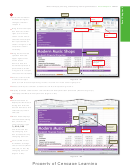 65
65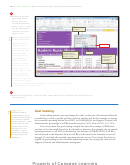 66
66 67
67 68
68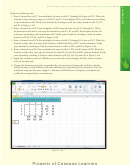 69
69 70
70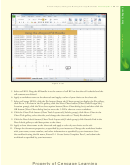 71
71 72
72 73
73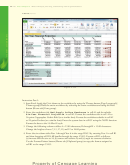 74
74 75
75 76
76 77
77 78
78 79
79 80
80 81
81 82
82 83
83 84
84 85
85 86
86 87
87What-If Analysis, Charting, and Working with Large Worksheets
Excel Chapter 3
EX 151
Copying a Range of Cells to a Nonadjacent
Destination Area
The What-If Assumptions section should be placed in an area of the worksheet that is
Fitting Entries in a Cell
An alternative to
accessible easily yet does not impair the view of the main section of the worksheet. As
increasing column widths
shown in Figure 3 – 3a on page EX 142, the What-If Assumptions should be placed above
or row heights is to shrink
the calculations in the worksheet. Additionally, the row titles in the Expenses area are
the characters in a cell
the same as the row titles in the What-If Assumptions table, with the exception of the
to fi t the current width
two additional entries in cells A4 (Margin) and A7 (Sales Revenue for Bonus). Hence, the
of the column. To shrink
to fi t, click Format Cells:
What-If Assumptions table row titles can be created by copying the range A16:A20
Alignment Dialog Box
to the range A2:A6 and then inserting two rows for the additional entries in cells A4
Button Launcher (Home
and A7. The source area (range A16:A20) is not adjacent to the destination area (range
tab | Alignment group),
A2:A6). The fi rst two chapters used the fi ll handle to copy a source area to an adjacent
and click Shrink to fi t in
the Text control area.
destination area. To copy a source area to a nonadjacent destination area, however, you
After shrinking entries to
cannot use the fi ll handle.
fi t in cells, consider using
A more versatile method of copying a source area is to use the Copy button and
the Zoom slider on the
Paste button (Home tab | Clipboard group). You can use these two buttons to copy a
status bar to make the
entries more readable.
source area to an adjacent or nonadjacent destination area.
To Copy a Range of Cells to a Nonadjacent Destination Area
The Copy button copies the contents and format of the source area to the Offi ce Clipboard, a reserved place
in the computer’s memory that allows you to collect text and graphics from an Offi ce document and then paste
them into almost any other type of document. The Paste button copies the item from the Offi ce Clipboard to the
destination area.
The following steps enter the what-if area row heading and use the Copy and Paste buttons to copy the range
A16:A20 to the nonadjacent range A2:A6.
1
Home tab
Paste
•
With cell A1 selected, type
button
What-If Assumptions
as the new row title.
Cut button
•
Select the range A16:A20 and then
click the Copy button (Home tab |
Clipboard group) to copy the values
Copy button
and formats of the selected range,
A16:A20 in this case, to the Offi ce
Clipboard.
top cell of destination area
•
Select cell A2, the top cell in the
destination area (Figure 3 –12).
Why do I not need to select the
entire destination area?
You are not required to select the
entire destination area (range
source area
A2:A6) before clicking the Paste
surrounded by
marquee
button (Home tab | Clipboard
group). Excel needs to know only
the upper-left cell of the destination
area. In the case of a single column
range, such as A2:A6, the top cell
of the destination area (cell A2)
Figure 3 – 12
also is the upper-left cell of the
destination area.
ADVERTISEMENT
0 votes
Related Articles
Related forms


Related Categories
Parent category: Education