What-If Analysis, Charting, And Working With Large Worksheets Page 20
ADVERTISEMENT
 1
1 2
2 3
3 4
4 5
5 6
6 7
7 8
8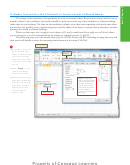 9
9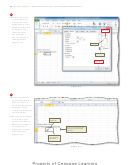 10
10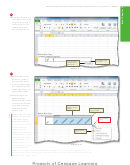 11
11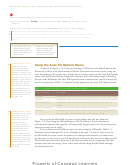 12
12 13
13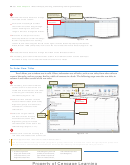 14
14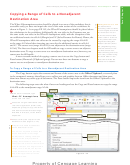 15
15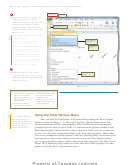 16
16 17
17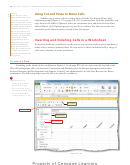 18
18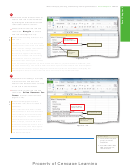 19
19 20
20 21
21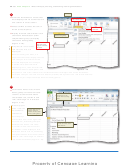 22
22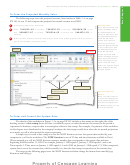 23
23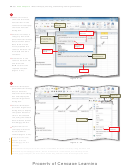 24
24 25
25 26
26 27
27 28
28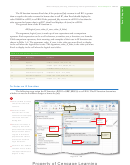 29
29 30
30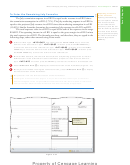 31
31 32
32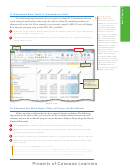 33
33 34
34 35
35 36
36 37
37 38
38 39
39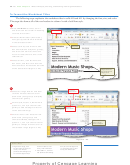 40
40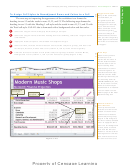 41
41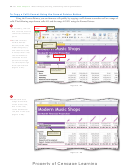 42
42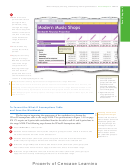 43
43 44
44 45
45 46
46 47
47 48
48 49
49 50
50 51
51 52
52 53
53 54
54 55
55 56
56 57
57 58
58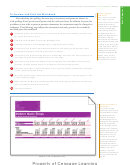 59
59 60
60 61
61 62
62 63
63 64
64 65
65 66
66 67
67 68
68 69
69 70
70 71
71 72
72 73
73 74
74 75
75 76
76 77
77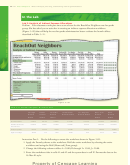 78
78 79
79 80
80 81
81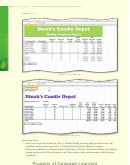 82
82 83
83 84
84 85
85 86
86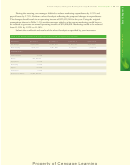 87
87EX 156
Excel Chapter 3
What-If Analysis, Charting, and Working with Large Worksheets
Inserting Multiple
Inserting Columns
Rows
If you want to insert
You insert columns into a worksheet in the same way you insert rows. To insert
multiple rows, you have
columns, select one or more columns immediately to the right of where you want Excel
two choices. You can insert
to insert the new column or columns. Select the number of columns you want to insert.
a single row by using the
Next, click the Insert button arrow (Home tab | Cells group) and then click Insert Sheet
Insert command on the
shortcut menu and then
Columns in the Insert list or right-click the selected column(s), then click Insert on the
repeatedly press
to
F 4
shortcut menu. The Insert command on the shortcut menu requires that you select an
continue inserting rows.
entire column (or columns) to insert a column (or columns). Following the insertion
Alternatively, you can select
of a column, Excel displays the Insert Options button, which allows you to modify the
any number of existing
insertion in a fashion similar to that discussed earlier when inserting rows.
rows to choose the number
of rows that you want to
insert. For instance, if you
want to insert fi ve rows,
Inserting Single Cells or a Range of Cells
select fi ve existing rows in
the worksheet, right-click
The Insert command on the shortcut menu or the Insert Cells command on the
the rows, and then click
Insert list of the Insert button (Home tab | Cells group) allows you to insert a single cell
Insert on the shortcut menu.
or a range of cells. You should be aware that if you shift a single cell or a range of cells,
Dragging Ranges
however, it no longer lines up with its associated cells. To ensure that the values in the
You can move and insert
worksheet do not get out of order, spreadsheet experts recommend that you insert only
a selected cell or range
between existing cells by
entire rows or entire columns. When you insert a single cell or a range of cells, Excel
holding down the
SHIFT
displays the Insert Options button so that you can change the format of the inserted cell,
key while you drag the
using options similar to those for inserting rows and columns.
selection to the gridline
where you want to insert
the selected cell or range.
Deleting Columns and Rows
You also can copy and
insert by holding down
+
The Delete button (Home tab | Cells group) or the Delete command on the
the
keys while
CTRL
SHIFT
you drag the selection to
shortcut menu removes cells (including the data and format) from the worksheet. Deleting
the desired gridline.
cells is not the same as clearing cells. The Clear command, described in Chapter 1 on page
Ranges and Undo
EX 52, clears the data from the cells, but the cells remain in the worksheet. The Delete
The incorrect use of
command removes the cells from the worksheet and shifts the remaining rows up (when
copying, deleting,
you delete rows) or shifts the remaining columns to the left (when you delete columns).
inserting, and moving
If formulas located in other cells reference cells in the deleted row or column, Excel does
ranges of cells have
the potential to render
not adjust these cell references. Excel displays the error message #REF! in those cells to
a worksheet useless.
indicate a cell reference error. For example, if cell A7 contains the formula =A4+A5 and
Carefully review the
you delete row 5, Excel assigns the formula =A4+#REF! to cell A6 (originally cell A7) and
results of these actions
displays the error message #REF! in cell A6. Excel also displays an Error Options button
before continuing on to
the next task. If you are
when you select the cell containing the error message #REF!, which allows you to select
not sure the result of the
options to determine the nature of the problem.
action is correct, click the
Undo button on the Quick
Access Toolbar.
To Enter Numbers with Format Symbols
The next step in creating the Six-Month Financial Projection worksheet is to enter the what-if assumptions
values in the range B2:B8. The numbers in the table can be entered and then formatted as in Chapters 1 and 2, or each
one can be entered with format symbols. When a number is entered with a format symbol, Excel immediately displays
it with the assigned format. Valid format symbols include the dollar sign ($), comma (,), and percent sign (%).
If you enter a whole number, it appears without any decimal places. If you enter a number with one or more
decimal places and a format symbol, Excel displays the number with two decimal places. Table 3–5 illustrates several
examples of numbers entered with format symbols. The number in parentheses in column 4 indicates the number of
decimal places.
ADVERTISEMENT
0 votes
Related Articles
Related forms


Related Categories
Parent category: Education